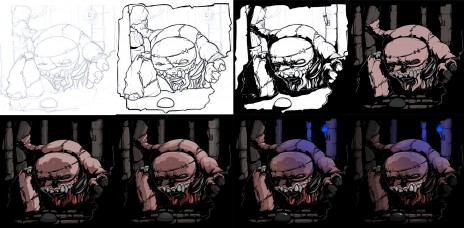
I was always a fan of illustration blogs where the artist puts up a sep by step break down of how the illustration in question unfolded, since i do most of my work in flash and save each step on a frame i thought it would be pretty easy to export it for all to see.
step 1: i always sketch on paper when im working on a complex drawing, imy brain doesnt have a clear enough connection to my pen pad to totally bust out 100% digital.
step 2: starting basic inking in flash on the layer above the sketch, just getting all core lines in place so i can start thinking about shadows.
step 3: next i start blocking out the big areas of darkness making sure to keep slight areas of exposed light on the outer edges of the more dark areas to hold the image together.
step 4: dropping a few layers under the ink i start blocking out the core colors. i also cleaned up some of the background details and blocked out the rest of the darkness.
step 5-6: adding shadow and highlights to the colors using the torch in the background as a rough light source.
step 7: threw in the blue torch with a light blue gradient overlay. i also started to add specular highlights and other "wetness"
step 8: finally went through with a transparent black and darkened a few areas i felt stood out too much and put a little more details here and there.
For the final image i put a little more work into the torch and other small areas here and there to help the image pop more.
Check out the final high rez art here
I dont know many other artist who work exclusively in flash, i sometimes work in photoshop but have found that flashes "line smoothing" and over all setup just goes with my style a bit more.
i hope this was somehow helpful and/or entertaining to any of you.
-Edmund
Click here for high rez art of the step by step image below.


